I leave here a quick note on setting Politecnico di Milano Wi-Fi for I myself had trouble doing it. I wish to thanks Alessio M. Franchi, who helped me out a lot getting started with Ubuntu and all the people pushing me towards using it. Enjoy and comment.
All instructions can be found on this page. As far as today, most useful safe Wi-Fi connection in Politecnico is polimi-protected and you would like to have it configured for automatic connection. The following instructions are intended for students and were tested on Ubuntu 14.04 LTS. You may test different configurations. Doing this job while being inside Politecnico di Milano can be difficult. You might want to consider trying this at home.
In the linked page, login and get files for Linux/Ubuntu. While I’m composing this note, the archive you get is composed out of 4 files and its name is PolimiWifiLinux. Then, check out this configuration page.
1. Install configuration package:
Unzip the configuration package in a convenient location (for example in home, they must be readable by the user who establishes the connection).
This is pretty straightforward. Unzip the package and put it in a convenient directory you can access (i.e. you know the path of). They suggest putting it into /home. For newbies of Ubuntu, what the heck is this?
In Windows, there is no top-level file directory under which everything else lives. C:\ is for the main drive, and D:\ and E:\ (etc.) are for all subsequent drives that get plugged in. In Linux (and Mac OS X), the root directory (represented by a single forward slash, and not to be confused with the /root directory which lives underneath / ) is the single top-level directory under which everything else lives, including /home.
The /home directory is where all user personal files and settings live, so by having a separate /home partition, you can reinstall all the system files and still preserve your music, bookmarks, and photos. Ubuntu will see /home as just another folder living underneath /, but the home folder will really be its own disk partition that lives apart from the rest of the folders.
I have put all files in Documents (in a clean install, the path to Documents should be /home/<yourUserName>/Documents).
Note: keep that folder you download together as it is. Rename it, if you want, but do not touch the files in it. Note also: every time you move that folder after you complete the setup, you’ll have to manually update paths to certain files. You may want to do it at the very beginning of the process.
2. Wpa supplicant installation.
If is not already present in your distribution, download wpa supplicant from the website http://hostap.epitest.fi/wpa_supplicant/
You will need an internet connection for this.
On my fresh install of Ubuntu, this package was not already installed. So, in order to get it, open up the Console (you can do it using this shortcut: ctrl + alt + T) and type
sudo apt-get install wpasupplicant
Briefly, you are asking permission to a full priviledge access (sudo), then you are calling a package manager (apt-get) which will automatically copy (install) certain files in certain location, retrieving them from the internet. wpasupplicant is the name of the package that will be searched in the online repositories. You can check the name of the package: start typing package name and then hit tab twice. You will be prompted with packages which name starts like that.
You will be asked to insert your password. Do it, and you should be done.
3. Network-manager configuration
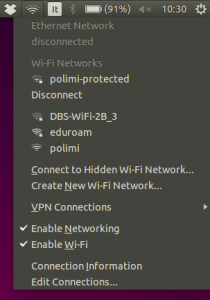
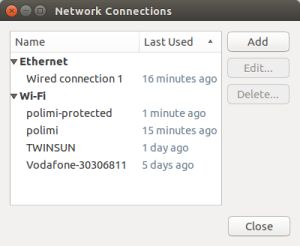
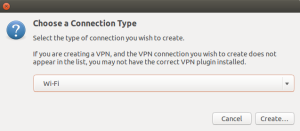
This passage should be easy. Let us forget about the Console for the moment, and take the GUI path instead. Configure a new connection following the instructions showed by the attached figure. To open that window, look in the upper-right corner of your screen. You should be able to find the Wi-Fi symbol, click on it (figure 1) and a menu will appear. Navigate it, add a connection, name it “polimi-protected” and configure it (make reference to figures 2 and 3 and to the image on the configuration page – linked above).


Note: if your PC has an hardware button to switch wireless antenna on/off, toggle it a couple of times.
Congratulations! You are good to go.
If anything has gone wrong, let me know in the comments. Please, drop me a line if you have ever tried to do this the other way round (using Console).